Contents
Getting Started
By ‘Business Operating System’, we mean one configurable platform where leads, customers, sales, inventory, billing, projects, and custom workflows run together on shared data, with dashboards and automations.
Follow these steps to get started.
Quick Setup (5 minutes)
- Create your account: Sign up with your email. Verify your email address via the confirmation link sent to your inbox.
- Set up your Workspace: Enter your business name, choose your industry, and select a subscription plan. Your workspace is your isolated business environment.
- Set Up a Business Solution or Module: Head to Marketplace to install a ready-to-run industry solution (such as the Distributor System or Field Sales System), or pick individual business modules like Inventory, CRM Lite, or Sales & Billing. You can also visit Manage → Schema Editor to build a custom data structure from scratch.
- Add your data (optional): Start creating records manually, or use Settings → Data Management → Import to bulk-upload from CSV.
🎯 Interactive Setup Guide: Look for the Workspace Setup Guide floating widget docked in the bottom-right corner of your dashboard. It will help you step by step in setting up your workspace with details like profile, tax setting, team members, business modules, and importing existing records to the workspace.
Navigating the App
- Sidebar: Your main navigation. Displays custom menus, Dashboard, Marketplace, and the Manage section (Schema Editor, Automations, Team, Audit Logs).
- Settings: Access via the gear icon to manage workspace details, subscription plans, team passwords, and data import/export.
- Notifications: The bell icon in the header displays automation alerts and status updates.
Install Entifly App
Entifly works as a Progressive Web App (PWA): you can install it directly from your browser onto your desktop, laptop, or mobile device. Once installed, it opens in its own window without browser toolbars, launches from your home screen or dock, and functions like a native app.
✨ Why install? Faster access from your home screen, a full-screen experience without browser UI, and reliable access even with spotty connectivity.
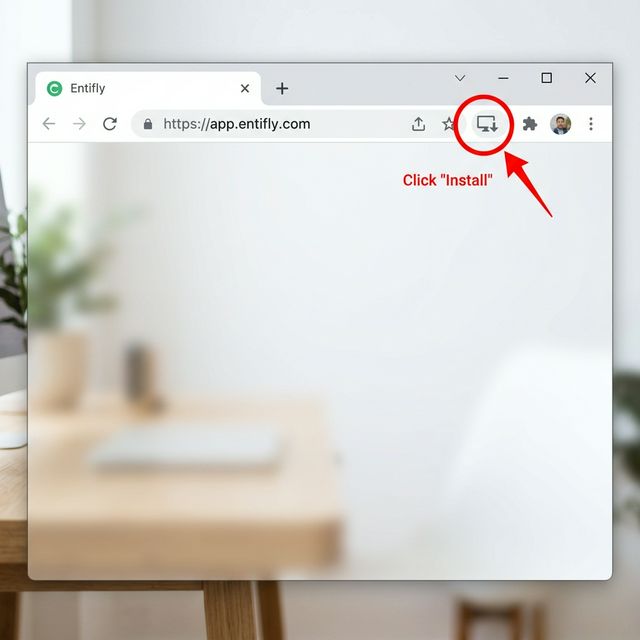
Google Chrome: Desktop (Windows / Mac / Linux)
- Open Google Chrome and navigate to your Entifly app URL (e.g.
app.entifly.com). - Look for the Install icon (a small monitor with a down arrow ⊕) on the right side of the address bar.
- Click the icon and select "Install" in the dialog that appears.
- Entifly will open in its own standalone window. A shortcut is added to your desktop and Start Menu (Windows) or Launchpad (Mac).
Google Chrome: Android
- Open Chrome on your Android phone and go to your Entifly app URL (e.g.
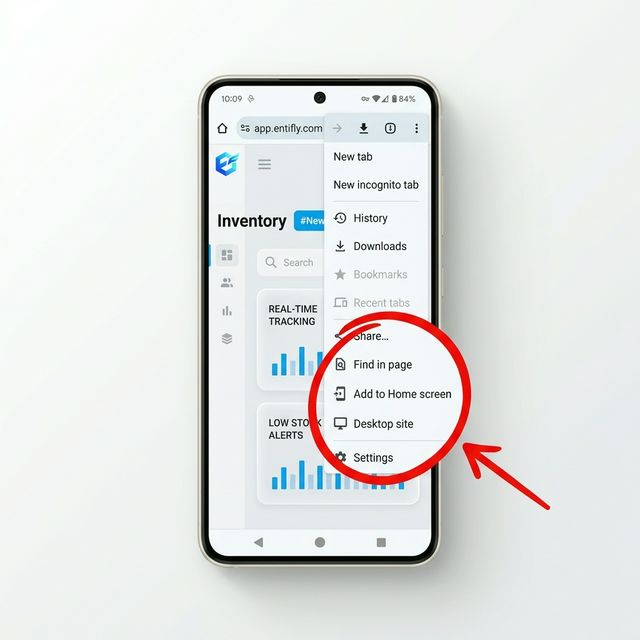
app.entifly.com). - Tap the three-dot menu (⋮) in the top-right corner.
- Tap "Add to Home screen" or "Install app" (wording may vary by Chrome version).
- Confirm by tapping "Add". The Entifly icon will appear on your home screen.
Safari: iPhone / iPad
- Open Safari on your iPhone or iPad and navigate to your Entifly app URL (e.g.
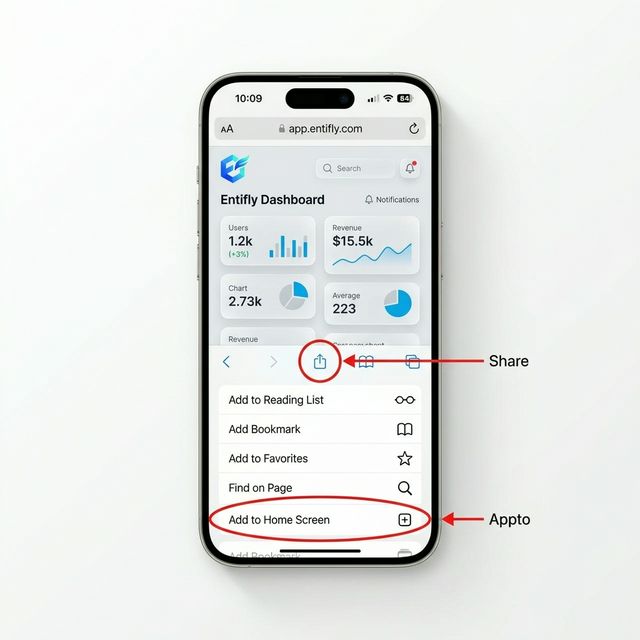
app.entifly.com). - Tap the Share button (the square with an upward arrow □↑) at the bottom of the screen.
- Scroll down in the share sheet and tap "Add to Home Screen".
- Edit the app name if desired, then tap "Add". Entifly will appear as an icon on your home screen.
Note: On iPhone/iPad, only Safari supports installing web apps. Chrome and other iOS browsers do not have this feature.
Other Browsers
Microsoft Edge (Desktop)
Look for the Install icon (an app window with a plus sign ⊞) in the right side of the address bar. Click it and select "Install". The app will open in a standalone window and be added to your Start Menu.
Safari (Mac: macOS Sonoma or later)
Go to File menu → "Add to Dock", or click the Share button in the toolbar → "Add to Dock". Entifly will appear in your Dock and Launchpad as a standalone app.
💡 Tip: Once installed, Entifly will automatically update in the background whenever a new version is available. When you see a "New Update Available" prompt, just tap reload to get the latest version.
Marketplace
The Marketplace is where you set up the operational backbone of your business, either as a complete industry solution or by choosing individual business modules.
Business Solutions (Recommended)
The Marketplace defaults to the Business Solutions view: pre-configured bundles designed for specific industries. Each solution installs multiple modules at once so you can start operating immediately.
Business Solutions are available on Starter, Growth, and Business plans. Free workspaces can install individual modules within their plan quota.
How to Install a Business Solution
- Navigate to Marketplace in the sidebar.
- Choose the solution that matches your industry (e.g., Distributor System, Field Sales System).
- Click Set Up This System. A modal will display all included modules and their installation status.
- Click Install Modules. All modules are installed in one step; already-installed modules are automatically skipped.
💼 Agency & Service Business System
Clients, projects, timesheets, invoicing and retainer management in one place.
📦 Distributor & Wholesaler System
Inventory, Sales Orders, CRM, Collections, and Team: everything a distribution business needs.
👥 Field Sales Business System
Lead pipeline, mobile sales orders, daily activity tracking and payment collection reminders.
☀️ Solar & Renewables Business System
Project tracking from site survey to execution, inventory tracking, and maintenance schedules.
👷 Construction & Contractor System
Daily logs, project management, site cost tracking, and contract billing.
🏭 Manufacturer System
Raw materials, production orders, finished goods, and real-time job profitability.
🚗 Automotive Business System
Vehicle inventory, lead pipeline, service tickets, invoicing and deal tracking.
🏢 Real Estate Business System
Property listings, buyer preferences, showing schedules, and commission tracking.
Business Modules
Switch to Business Modules view using the toggle at the top of the Marketplace to add specific modules to your workspace without installing a full solution.
When a module requires other modules, Entifly installs the missing prerequisites automatically and counts the complete installation against your module quota.
How to Install a Business Module
- Click the Business Modules tab at the top of the Marketplace.
- Use the search bar or category filters to find the module you need.
- Click Install Module — a modal shows what entities, fields, and automations will be created.
- Click Install. The system sets everything up automatically.
📦 Inventory Management
Products, Categories, Suppliers, Stock Movements. Barcode scanning and stock-level dashboards.
👥 CRM Lite
Contacts, Accounts, Deals, Activities. Kanban pipeline view and deal-stage dashboards.
💰 Sales & Billing
Sales orders, invoices, and payment tracking with customer references.
💳 Expense Tracking
Expenses, Categories, Budgets with approval workflows and spend summaries.
🏢 Team Lite
Employees, Leave Requests, Attendance. Role-based access so staff only see their own records.
📋 Project Management
Projects, Tasks, Milestones. Kanban boards and related lists inside projects.
🛒 Purchasing & Procurement
Purchase orders, vendor bills, and inventory receiving linked to your operational needs.
All modules can be customized after installation — add fields, remove entities, or modify automations to fit your exact workflow.
Core Concepts
Entifly is built around a few powerful concepts that let you model any business process.
Entities
A type of data you want to track, like "Customers", "Products", "Tasks", or "Invoices". Think of it as a smart database table. You define the structure; Entifly auto-generates the forms, lists, and views.
Records
Individual entries within an Entity. For example, "John Doe" is a record in your "Customers" entity. Each record holds data according to the fields you defined.
Fields
Properties of an Entity, like "Email", "Amount", "Status", or "Due Date". Entifly supports 22+ field types including text, numbers, dates, formulas, barcodes, file uploads, and references.
Relationships
Connections between Entities. A "Project" can have many "Tasks". An "Order" belongs to a "Customer". Use Reference and Related List fields to link your data together.
Views
Different ways to see your records: Data Grid (table with sort/filter), Kanban Board (drag-and-drop cards), Calendar View (month, week, and day timelines), and Print View.
Roles
Three permission levels:
Admin (full access),
Manager (data + team management),
Staff (day-to-day operations).
Automations
Rules that run automatically when records are created, updated, or deleted. Send notifications, create linked records, or update fields without writing code.
Schema Editor
The Schema Editor is where Admins define their data structure. Access it via Manage → Schema Editor.
Creating an Entity
- Click New Entity.
- Enter a name (e.g., "Tasks"), optional description.
- ID Prefix: Set a prefix for auto-generated record IDs (e.g., "TSK" → TSK2609001). The ID format follows
PREFIX + YYMM + 3-digit counter. If left blank, it defaults to the first 3 letters of the entity name. - Configure Role Permissions: Choose which roles (Admin, Manager, Staff) can Read, Write, and Delete records.
- Set Print Format: Choose between "Form" layout or "Invoice" layout for print views.
- Click Save.
Managing Fields
- Expand an entity and click Add Field.
- Enter a Display Label (the field name is auto-generated).
- Choose a Field Type (see Field Types Reference below).
- Set Required if the field must be filled on every record.
- Set Min Role to Edit to restrict who can change this field (e.g., only Managers can edit "Status").
- Default Value & Smart Tokens: Pre-fill values for new records. Supports static values, system dates (
TODAY(Dynamic)), user ID lookup (Current Logged-in User), or dynamic user profile tokens (e.g.,Logged-in User → name,Logged-in User → email,Logged-in User → role) to automatically record creator or rep details. - Section: Group related fields under a section heading in forms.
- Column Width: Choose "Half" (side-by-side) or "Full" (spans entire row) layout.
Record Actions (One-Click Workflows)
Record Actions define fast, synchronous action buttons rendered in the record modal and detail view header (e.g., approval workflows like "Approve", "Reject", "Reopen", or "Close Deal"). Unlike background automations, Record Actions execute immediately with optimistic UI updates.
- Expand an entity in Schema Editor and click Record Actions.
- Action Label & Style: Enter a button label (e.g., "Approve") and select a variant: Primary, Success (green), Danger (red), Warning (amber), or Secondary. Choose an optional Lucide icon.
- Allowed Roles: Restrict which team roles (Admin, Manager, Staff) can view and trigger the action button.
- Display Conditions (Visible If): Specify conditions under which the button appears (e.g., only show "Approve" when
Status equals PendingandApprover equals Current User). - Confirmation Dialog: Optionally require a confirmation modal with custom title, prompt message, and confirm button text before executing.
- Field Updates: Define field changes applied instantly upon clicking the button (e.g., set
Statusto "Approved"). Supports dynamic tokens likeLogged-in User → nameandTODAY (Dynamic).
💡 Combining with Record Locking: Pair Record Actions with Record Locking rules. For example, clicking "Approve" sets the record status to "Approved", which automatically triggers a locking rule to lock the record from further manual editing.
Other Schema Features
- Primary Field: Click the star icon on a field to make it the primary display field (shown in list titles and references).
- Reorder Fields: Use the up/down arrows to change field order in forms and views.
- Delete Fields: Click the trash icon. System fields cannot be deleted.
Field Types Reference
Entifly supports 22+ field types to handle any kind of business data.
Short Text: Single-line text input. Ideal for names, titles, codes.
Long Text: Multi-line text area for descriptions, notes, comments.
Rich Text: HTML editor with formatting (bold, italic, lists, links).
Number: Numeric values. Used in formulas and aggregations.
Currency: Number with currency symbol (configurable: $, ₹, €, etc.). Symbols can also be used in formula calculations for consistent formatting.
Percentage: Number displayed as a percentage.
Email: Validated email address field with clickable mailto link.
Phone: Phone number field with clickable tel link.
URL: Web address field with clickable external link.
Date: Date picker (YYYY-MM-DD). Useful for due dates, start dates.
Date & Time: Date + time picker for precise timestamps.
Checkbox: Yes/No toggle. Great for flags like "Is Active" or "Paid".
Single Select: Dropdown with one selectable option (e.g., "Open", "In Progress", "Closed"). Supports custom color badges (gray, blue, green, yellow, orange, red, purple, pink) configured directly in the Schema Editor for instant visual status scanning in lists and kanban boards.
Multi-Select: Dropdown allowing multiple selections with custom color badge tags (e.g., Tags, Categories, Skills).
Radio Buttons: Like Single Select but displayed as radio buttons for small option sets.
Rating: Star rating (1-5). Useful for reviews, priority scoring.
Formula: Auto-calculated value from other numeric fields. Syntax: use field names like quantity * unit_price. Supports +, -, *, /.
Barcode / QR Code: Scannable field using your device's camera. Perfect for inventory, asset tracking.
Image: Upload images (photos, logos). Displayed as thumbnails in lists and galleries in forms.
File: Upload any file type (PDFs, documents, spreadsheets). Up to 20 attachments per record.
Reference (Lookup): Links to a single record in another entity. Example: "Customer" field on an Order linking to the Customers entity.
Multiple References: Links to multiple records in another entity.
Related Records (Tabs): Displays a list of child records inside a parent record. Example: all "Tasks" shown inside a "Project". See Relationships section below.
Relationships & Related Lists
Relationships let you connect entities together to model real-world business logic.
Simple References (Lookups)
Add a Reference field to link one entity to another. When creating a record, you'll see a searchable dropdown of records from the referenced entity.
Example: An "Order" entity with a "Customer" Reference field lets you pick which customer placed the order.
Related Lists (One-to-Many)
Related Lists display child or connected records directly inside a parent entity's view, such as seeing all Tasks inside a Project. Primary fields are linked for rapid cross-navigation, with dynamic "View All" filters to navigate between related records.
How to Set Up a Related List (One-to-Many)
- Prerequisite: The child entity (e.g., Tasks) must have a Reference field pointing back to the parent entity (e.g., Project).
- Open the parent entity in Schema Editor and add a new field.
- Choose type "Related Records (Tabs)".
- Select the child entity (e.g., Tasks).
- Set Link Type to "Foreign Key" and select the reference field in the child entity that points to the parent.
- Choose Display Fields: The columns shown in the related list table (e.g., Task Name, Status, Due Date).
How to Set Up a Related List (Many-to-Many)
- No reference pointing is required.
- Open the parent entity in Schema Editor and add a new field.
- Choose type "Related Records (Tabs)".
- Select any reference entity (e.g., Items).
- Set Link Type to "Manual Link".
- Direction (Forward vs Reverse): By default, directions are "Forward" (this record owns the mapping and can add new items). Set to "Reverse" on the target entity to mirror the identical mapped data from the other side (Reverse lists are read-only). If Reverse, select the "Source Field" linking to the forward mapping.
- Check the checkbox Allow adding same record multiple times to add multiple instances of the same record.
- Choose Display Fields: The columns shown in the related list table (e.g., Name, Quantity).
- Add Inline Fields: Add custom editable columns directly within the related list for quick data entry.
- Add Label for the inline field.
- Select the type of field (e.g. text, numeric, date).
- Select Snapshot/Copy of reference field or provide default value. E.g. Copy Price from reference field or provide default value.
- Row Formulas: Add calculated columns that compute values from each child row (e.g., line total = qty × price). Add fields in the formula expression using the Insert fields button.
- Column Ordering: Set the order of the columns in the related list table.
- Footer Aggregates: Show sum, average, min, or max at the bottom of the related list (e.g., total order amount).
Navigation & Views
Customize your application's navigation menu layout
Navigation Menu
- Go to Manage → Navigation Menu.
- Click New Menu: Enter name, select icon, and link to an entity.
- Create Sub-Menus for grouping related entities.
- Move up or down to reposition or toggle visibility to hide menus.
Entifly offers multiple ways to view and interact with your data.
The default view for any entity. Features include:
- Sort: Click any column header to sort ascending or descending.
- Filter: Use the filter icon to create conditions (e.g., "Status = Open AND Priority = High").
- Search: Full-text search across all record fields.
- Context Menu: Right-click any row for quick actions: View, Edit, Delete, Print.
- Pagination: Navigate through large datasets with page controls.
Visual card-based view for tracking work stages. Available on any entity that has a Select (dropdown) field.
- Click the Kanban toggle at the top of any entity list.
- Choose the grouping field (e.g., "Status"): each option becomes a column.
- Drag and drop cards between columns to update the field value instantly.
- Click any card to view or edit the full record.
- Filters, search, and pagination are all supported.
Time-based timeline for scheduling, deadlines, and operational events. Available for any entity with date or datetime fields.
- Click the Calendar icon at the top of any entity list to switch to the calendar view.
- Multiple View Modes: Switch between Month, Week, and Day layouts depending on your operational focus.
- Synchronized 24-Hour Timeline: Week and Day views provide an hourly breakdown (formatted in standard 12-hour AM/PM time) with a dedicated top section for all-day records.
- Configurable Date Field: Click Calendar Settings (gear icon) to choose which date or datetime field drives the calendar (defaults to creation date or any custom date/datetime field).
- Quick Add from Calendar:
- In Month view, hover over any date cell and click the + icon. Adding on today automatically pre-fills the current time for datetime fields, while other dates default to 09:00 AM.
- In Week and Day views, click on any hourly time slot to pre-fill a new record with that specific date and scheduled time.
- Smart Preferences & Persistence: Entifly remembers your preferred view mode (Month, Week, or Day) and mapped date field per entity, automatically restoring your layout when you return.
Generate clean, professional printable summaries of any record. Choose between Form layout (standard fields) or Invoice layout (standard A4 ERP tax invoice format).
- Invoice Customizer Drawer: Click the gear icon on any invoice print screen to customize supplier headers, toggle customer fields, configure line-item columns, and tailor terms & conditions.
- Dynamic Tax Identifiers: Automatically render business GSTIN/VAT/EIN numbers and statutory PAN in the invoice header.
- Dual-Regime Tax Engine (India): Automatically calculates intra-state (CGST + SGST) vs inter-state (IGST) tax breakdowns based on client and store registered states, complete with currency-in-words translation.
- Instant UPI QR Payments (India): Dynamically renders a scannable UPI QR code in the remittance footer so customers can scan and pay invoices immediately from any UPI app (Google Pay, PhonePe, Paytm).
Automations
Automations let you put repetitive tasks on autopilot. Configure rules that trigger automatically when records change.
Creating an Automation
- Navigate to Manage → Automations and click New Automation.
- Name your automation and select the Entity it applies to.
- Choose a Trigger Event:
- Record Created: Fires when a new record is added.
- Record Updated: Fires when any field on a record changes.
- Record Deleted: Fires when a record is removed.
- Created or Updated: Fires on both creation and updates.
- Related Record Events: Fires when a child record in a related list is created, updated, or deleted.
- Add Conditions (optional): Filter when the automation should run:
- Example: "If Status equals 'Approved' AND Amount is greater than 1000"
- Use AND/OR logic to combine multiple conditions.
- Enable "Trigger on Change" to fire only when a specific field's value actually changes.
- Add Actions: What happens when conditions are met:
- Send Notification: Alert a user with a custom message.
- Create Record: Auto-create a record in another entity.
- Update Record: Modify fields on the triggering record or update up to 100 related records in bulk.
Dynamic Variables & Inline Token Editor
Use dynamic variables in notifications, messages, and record mappings. Entifly provides an intuitive Inline Token Editor with a visual Variable Picker:
- Interactive Token Pills: Variable tokens appear directly inline as colored chips (e.g.,
[Trigger → Status],[Trigger → Assigned To],[Target → Name]) alongside your message text. - Visual Variable Picker: Popover that lets you search and select variables grouped by Trigger Record Fields, Previous Values (
Before → Trigger Field), Target Fields, Related Parent Fields, and System Constants (like Today's Date or Current User). [Trigger → Assigned To]: The user assigned to the record.[Trigger → ID]: The record ID (useful for linking notifications back to the record).[Trigger → Parent → Field Name]: Access parent record fields when using related record triggers.[Trigger → Status]: The current status value.
Dashboard & Widgets (Metrics)
The Dashboard gives you a real-time command center for your business. Build it with modular widgets that visualize your data.
Adding a Widget
- Click the "+ New" button on your dashboard.
- Name your widget/metric and select the Entity to pull data from.
- Choose a Widget Type: Bar Chart, Line Graph (Area with smooth gradients), Pie Chart (Donut with center total KPI), Funnel (Classic or segmented Pipeline view), or Metric Card.
- Configure Aggregation: Count, Sum, Average, Min, or Max.
- Set Aggregate Field (for Sum/Avg/Min/Max, e.g., "Amount").
- Set Group By field (e.g., group by "Status" or "Created Date" for monthly trends).
- Add Filters to show specific data subsets (e.g., "Status = Paid").
- Set Date Range (e.g., last 6 months) and Limit (e.g., top 5).
- Choose a Color Scheme and save.
Widget Embedding
Widgets are not limited to the main dashboard. You can embed them in:
- Entity Lists: See real-time metrics for your current data view. Enable "Sync with list filters" to have widgets automatically update as you filter your records.
- Record Views (Forms): Embed specific widgets directly inside a record detail view to see related metrics (e.g., a "Customer Spend" chart inside a Customer record).
Widget Examples
- Revenue by Month: Line chart, Sum of "Amount", grouped by "Created Date", last 12 months.
- Tasks by Status: Pie chart, Count, grouped by "Status".
- Total Expenses: Metric card, Sum of "Amount" where Status = "Paid".
- Top Customers: Bar chart, Count of Orders, grouped by "Customer", limit 5.
Click the Expand icon on any chart or table widget to inspect it in a full-screen Lightbox view with direct record drilldown. Use the widget menu to edit or delete it, or drag widgets to rearrange your dashboard grid.
Data Management
Your data belongs to you. Entifly makes it easy to move data in and out of the platform.
Importing Data (CSV)
Bulk upload records from your existing spreadsheets. Available on paid plans.
- Go to Settings → Data Management.
- Click Start New Import.
- Select the Entity to import records into.
- Upload your CSV file. The system will parse and preview your data.
- Map columns: Match your CSV column headers to entity fields. Reference fields are validated against existing records.
- Review the preview and click Import.
Exporting Data (CSV)
Available on all plans, including Free.
- Navigate to any Entity's list view.
- Click the Export button in the toolbar.
- A CSV file with all current records will be downloaded instantly.
Print Views
Open any record and click the Print icon to generate a clean, printable summary. Choose between Form or Invoice layout in Entity settings.
Team & Roles
Manage your team members and control what they can access.
Inviting Team Members
- Go to Manage → Team.
- Click Add Member.
- Enter the member's name, email, and assign a Role.
- The member will receive an email invitation to join your workspace.
Role Permissions
| Capability | Admin | Manager | Staff |
|---|---|---|---|
| Schema Editor | ✅ | ❌ | ❌ |
| Automations | ✅ | ❌ | ❌ |
| Team Management | ✅ | ✅ | ❌ |
| Audit Logs | ✅ | ❌ | ❌ |
| View/Edit Records | ✅ | ✅ | ✅ * |
| Dashboard | ✅ | ✅ | ✅ |
| Settings & Billing | ✅ | ❌ | ❌ |
* Staff access can be further restricted using Row Level Security and per-entity role permissions.
Security & Access Control
Entifly provides enterprise-grade security features to protect your data at every level.
Restrict which records a user can see based on field values. For example, a Sales Rep only sees leads where "Assigned To" equals their user ID.
How to configure:
- Open the entity in Schema Editor and click Edit.
- Scroll to Row Level Security and enable it.
- Add conditions (e.g., "Assigned To equals Current User").
- Set Exclude Roles: Admin and Manager typically bypass RLS.
- Choose AND/OR logic for multiple conditions.
Control who can edit specific fields using the Min Role to Edit setting on each field. Available options include Admin, Manager, Staff, and **None** (effectively making the field read-only for everyone).
Example: If you set "Min Role to Edit" to "Manager" on a "Status" field, Staff users can view the status but only Managers and Admins can change it.
Automatically lock records when they reach a certain state to prevent accidental edits.
How to configure:
- Open the entity in Schema Editor and click Edit.
- Scroll to Record Locking Rules.
- Add a rule: e.g., "Lock when Status = Approved OR Status = Rejected".
- Set Exclude Roles: Admins and Managers can still edit locked records.
💡 Tip: Combine Record Locking with Record Actions (one-click buttons) to establish robust sign-off workflows (e.g. an "Approve" button that transitions status to "Approved", automatically triggering record lock).
Every create, update, and delete action is automatically logged with the user who made the change, the timestamp, and the before/after values of changed fields.
Access audit logs via Manage → Audit Logs. Filter by entity, action type (Insert/Update/Delete), or date range. Expand any entry to see exactly which fields changed and their previous values.
Integrations
Entifly supports two integration modes: Inbound (pull or push data into Entifly via the API) and Outbound (automatically push data out to external tools when records change). Both are available on the Growth plan and above.
Access both from Manage → Integrations inside your workspace.
Inbound API
Use the Entifly REST API to read, create, update, and delete records in your workspace from any external system, script, or automation platform (e.g. Zapier, Make, n8n).
API Keys: Admin-level access
API keys grant full Admin-level access to your workspace data. Generate them in Manage → Integrations → API Settings. Copy and store each key immediately; it is shown only once for security. Revoke unused keys at any time.
Authentication & Base URL
Base URL: https://api.entifly.com/v1
Pass your API key in every request header:Authorization: Bearer <your_api_key>
Schema Discovery
Use these endpoints to discover your workspace's entity structure before generating payloads.
| Method | Endpoint | Description |
|---|---|---|
| GET | /schema/entities | List all accessible entities in the workspace. |
| GET | /schema/entities/:entity_name | Get full schema details for a specific entity including all field definitions. |
Standard CRUD Operations
| Method | Endpoint | Description |
|---|---|---|
| GET | /:entity_name | List records. Supports limit, offset, sortBy, sortOrder, and JSON where filters. |
| GET | /:entity_name/:id | Fetch a single record by its UUID. Reference fields are automatically resolved. |
| POST | /:entity_name | Create a new record. Supports atomic creation of nested child records. |
| PATCH | /:entity_name/:id | Update an existing record. Nested relations are managed via sub-resource endpoints. |
| DELETE | /:entity_name/:id | Delete a record. |
Relation Sub-Resources
Manage related lists (one-to-many or many-to-many) at a granular level.
| Method | Endpoint | Description |
|---|---|---|
| GET | /:entity/:id/:field | Fetch a paginated list of related child records. |
| POST | /:entity/:id/:field | Bulk append new items to an existing related list. |
| PATCH | /:entity/:id/:field/:rel_id | Update inline values (e.g., quantity) on a single relation row. |
| DELETE | /:entity/:id/:field/:rel_id | Remove a single item from the related list. |
💡 Smart References: When creating or updating records via POST/PATCH, you can resolve reference fields using the target's Primary Field (e.g., a customer's name) instead of their internal UUID, which keeps your payloads readable.
Outbound Webhooks
Outbound Webhooks let Entifly push real-time data to an external URL whenever records in your workspace are created, updated, or deleted without any polling. Use them to connect Entifly to tools like Zapier, Make, n8n, Slack, or your own backend services.
How it works
When a trigger event occurs (e.g., a new Order is created), Entifly immediately sends an HTTP POST request to your configured URL, containing the full record data as JSON. Your receiving endpoint can then log it, forward it to another tool, or trigger a downstream workflow.
Outbound Webhooks operate independently of Entifly's internal Automations engine, so they run in parallel without interfering with your automation rules.
Setting Up a Webhook
Go to Manage → Integrations → Webhooks (Outbound) and click Add Webhook.
- Webhook Name: A label for your own reference (e.g., "Send to Make.com" or "Notify Slack on New Lead").
- Trigger Entity: Select which entity's records should fire this webhook (e.g., "Orders", "Leads", "Tasks").
-
Trigger Events: Choose one or more events that fire the webhook:
- Record Created: Fires when a new record is added to the entity.
- Record Updated: Fires when any field on an existing record is changed.
- Record Deleted: Fires when a record is removed.
- Target Webhook URL: The full HTTPS URL that Entifly will POST to (e.g., your Zapier Catch Hook URL or a Make.com webhook endpoint).
-
Custom Auth Header (Optional): If your receiving service requires authentication, enter the full value to be sent in the
Authorizationheader (e.g.,Bearer your-secret-token). This is stored securely and is never shown again after saving.
Webhook Payload
Every webhook delivery sends a JSON body to your target URL. The payload includes the event type, the entity name, and the full record data at the time of the event:
{
  "event": "INSERT",
  "entity": "orders",
  "record": {
    "id": "273ef82b-0557-473a-a343-05956ccf5083",
    "sys_id": "ORD2609001",
    "customer": "Acme Corp",
    "status": "Pending",
    "amount": 5000,
    "created_at": "2026-05-18T10:00:00Z"
  }
}
The event field will be one of INSERT, UPDATE, or DELETE. The record object contains all field values for the record.
Managing Webhooks
⚠️ Plan Requirement: Inbound API keys and Outbound Webhooks are available on the Growth and Business plans. Attempting to create them on the Free or Starter plan will prompt you to upgrade.
Subscription Plans & Billing
Entifly offers predictable, flat-tier pricing designed specifically for SMEs. Unlike traditional SaaS platforms that penalize business growth with per-user seat licenses, Entifly charges a flat rate based on workflow capacity (entities, records, automations, and integrations) with unlimited team members on all paid plans.
Plan Comparison
| Plan | Pricing (Annual) | Pricing (Monthly) | Entities | Records Cap | Metrics & Automations | Team Members |
|---|---|---|---|---|---|---|
| Free | $0 / ₹0 | $0 / ₹0 | 5 custom entities | 500 (100 / entity) | 5 widgets, 5 automations | Up to 3 members |
| Starter | $24/mo (₹999/mo) | $29/mo (₹1,299/mo) | 15 custom entities | 30,000 (2K / entity) | 15 widgets, 15 automations | Unlimited (100 fair-use) |
| Growth | $59/mo (₹3,999/mo) | $69/mo (₹4,999/mo) | 40 custom entities | 400,000 (10K / entity) | 40 widgets, 40 automations | Unlimited (100 fair-use) |
| Business | $149/mo (₹9,999/mo) | $189/mo (₹11,999/mo) | 100 custom entities | 2.5M (25K / entity) | 100 widgets, 100 automations | Unlimited (250 fair-use) |
✨ Fair Use & Anti-Abuse Safeguards: Paid plans include unlimited users without per-seat penalty fees. Automated ceilings (100 active members on Starter and Growth; 250 on Business) protect database concurrency and low-latency syncing. Workspaces exceeding thresholds transition to higher tiers or bespoke Enterprise expansion.
Secure Online Payments & Invoicing
Entifly supports automated, secure recurring billing for all subscription tiers:
💳 Accepted Payment Methods
Secure checkout supporting international and domestic credit and debit cards (Visa, Mastercard, American Express), Apple Pay, and Google Pay.
🧾 Automated Invoicing & Receipts
Tax-compliant digital invoices and receipts are generated automatically upon every renewal cycle, accessible directly from your workspace billing settings.
Subscription Lifecycle & Grace Periods
- 14-Day Free Trial: Every new paid workspace begins with a 14-day full feature trial. No credit card is required upfront.
- Active: Recurring subscription is up-to-date and all features operate without interruption.
- Past Due (Grace Period): If a scheduled renewal payment fails, your workspace enters a protected grace period. Workspace Admins will see an alert in the top banner and Settings with direct options to update their payment method before service is halted.
- Canceled: If canceled, your workspace retains full paid access until the end of the current billing cycle.
Role-Aware Subscription Management
Subscription upgrades, cancellations, and payment method changes can only be performed by Workspace Admins via Settings → Subscription Plan. Non-admin members (Managers and Staff) see informative status indicators without billing actions or sensitive payment details.
Ready to explore all plan details?
Compare complete feature matrices, record quotas, and estimate your team's annual savings with our interactive pricing calculator.
Still have questions?
Our support team is here to help you get the most out of Entifly.
Contact Support